You'll often see us refer to 2-wire and 3-wire lighting systems. This is a vital point as many items, such as relays, can not work if installed right into a 2-wire system.
This application note describes the difference in between 2-wire as well as 3-wire lighting systems and assists you understand which variation you have in your installment.
First of all, what do we mean by 2-wire and 3-wire systems. The basic description is that a 2-wire system does not consist of a Neutral cable at the light switch, the 3-wire system does consist of the Neutral at the button.
2-wire Lights Solutions
This is one of the most typical lighting system in Europe, nearly all residences utilize this system, especially in the UK and also Nordic areas.
The term is somewhat confusing as the system will really consist of three cords. However, the third wire, which normally has a green/yellow sleeve is the Planet wire. The Earth is an extremely integral part of the electric system and all switches, devices and lights have to be correctly earthed. However, for the sake of simpleness we overlook the Earth cord when describing circuitry as it plays no active duty in the day-to-day workings of your light circuits.
3-wire Illumination Solutions
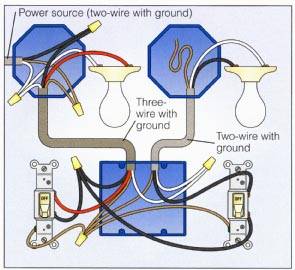
The 3-wire system is less typical than the 2-wire system, it includes a Neutral at the switch as well as the Live and also Switched Live wires.
An instance of a 3-wire illumination circuit is shown in Figure 2. One '2-Core + Earth' cable takes Live and also Neutral to the switch back box, a 2nd cord takes the Neutral and also Switched Live to the light.
Note - the Neutral is not connected to the real switch, the two Neutrals are attached together using a connector block.
Just how do I understand which system I have?
As the 2-wire system is the most common, it's possibly best to start with the assumption that you have a 2-wire system, particularly if you remain in the UK or if your home is greater than 3-5 years of ages.
You can inspect the adhering to factors:
• Are all the wires connected to the button?
• Do all the cables have a brownish sleeve on them?
• If the response is YES to either of these factors, you have a 2-wire system
• Do you have two blue, black or grey wires mosting likely to a port block? If so you MAY have a 3-wire system, but you need to verify this with a voltage meter or speak with a certified electrical contractor.

A Word of Care
Shut down the breaker managing the light as well as follower circuit. This is the single most important part of any type of house circuitry treatment. Also after switching off the breaker, it's still a good concept to utilize a voltage tester to check the cord connections before you work on them.
You'll Need to Make Pigtails
In electrical work, a pigtail is a collection of cords interlaced together with a brief length of wire. The pigtail permits you to attach all the cables to a single terminal. The trick to making a reliable one is to turn the cords together clockwise-- not counterclockwise-- before screwing on the cap. By doing this, the clockwise threads of the cap make the connection tighter when you screw it on.
Transforming From Two Buttons in the Very Same Box to One Switch Over
Separate both black cords from both buttons. If you don't understand which one materials power to every switch, turn the power back on and test the cords by connecting each to ground with your voltage tester. The real-time circuit cords will provide you a reading and the others will not. Transform the breaker withdraw when you understand which is which.
Make a pigtail with the two live wires and a brief size of black wire of the exact same gauge. Attach the short cord to the leading terminal of the switch you want to utilize. Do the same with both other cords, and link them down terminal of the button.
Unscrew the cap from both white cords offering the switch you're no longer using, include a short length of white cord of the exact same gauge as well as screw the cap back on to make a pigtail. You might require a larger cap than the one that got on there. Splice the other end of the short wire to both white cables offering the new switch. If you want, you can additionally merely splice all four white wires together under the very same cap, however you may discover that hard to do with 4 cables.
Remove the ground from the out-of-service button as well as the one from the button you're using. Attach them by twisting them together or making use of a crimp ring, after that connect them to the green ground terminal on the button you're using.
Attaching a Light as well as Follower to a New Switch
Locate the button cable television, which need to be sticking via the top or side of package offering the fan or light. Making use of cable pole dancers, strip an inch of insulation from completion of the black and white wires. Mate the black cord from the follower together with the black cable from the light and also the black cord from the switch, as well as cap them. Link the white cables with each other in the same way, after that repeat with the ground cords. When you splice ground wires, you don't need to top them, yet it's still a good concept to do so because the cap assists maintain them with each other. Mount the follower as well as light as well as transfer to the button box.
Connect the black wire from the follower down terminal of the switch as well as the live circuit wire to the top terminal. Entwine the white wires with each other and cover them. Twist the ground wires together as well as link them to the eco-friendly ground screw on the switch.
As a fervent person who reads about , I think sharing that article was worth the trouble. Sharing is good. Helping others is fun. We thank you for your readership.
In more information the event your new fan operates just fantastic but was having troubles likewise, it implies that possibly you have got defective wiring in your house and need to hire an individual to rewire it or there’s one thing Incorrect with each enthusiasts and they are on their own way out. Maintain testing!
These estimates are for Standard work done in serviceable situations by qualified trade experts applying MID GRADE products. Perform not described on this web page and/or do the job employing grasp craftsman, premium materials and challenge supervision will bring about Greater COSTS! Investigate the complete selection of ceiling lighting new installation labor selections and content selling prices below.
If rattling doesn’t occur in the LED bulb, the bulb could possibly have however burnt out. It is possible to examination this by connecting it to a different socket and viewing if it even now doesn't do the job.
And making an attempt this kind of very simple installation jobs by oneself is a superb strategy to skip those unwanted paying on using the services of an electrician. Also, it’s not tough if you can get to grasp The complete method very well. So, give it a try and maybe you’ll move to be a able handyman.
Initial points initial, you ought to know how lighting functions in your home. Doing this gives you a fuller appreciation of Whatever you’re taking on prior to deciding to begin. This is often how it really works.
Having said that, when there are separate switches, you can seamlessly control the move of energy towards the fan with one change, along with the stream of electric power on the light with another swap.
With that getting said, this could be more challenging if your space won't even have a light fixture to begin with. If Here is the case, the level of problem of one's job will go up substantially.
Ideally, your new light fitting will suit around your ceiling rose and there will be no ought to get it aside. The live and neutral of The brand new fitting simply just connect to the Dwell and neutral the aged fitting was faraway from.
Well, now you could remodel your own home with whichever ceiling light model tickles your fancy. Discovering tips on how to wire a ceiling light the correct way will save you some really serious banknotes.
As a way to pull this off, you will need to use a little bit of timber. It is possible to install your pretty own assistance brace using a length of two×4 lumber nailed on the ceiling joists on each side with the box locale.
Concurrently a cable is linked to the ceiling rose for the switch that controls that light. With everyday "A technique" lighting, ie just one change controls only one light, the diagrams and explanations down below implement.
Pertaining to move five, it needs to be pointed out that The point that The 2 DIP change sets were being configured in the same way might imply that the distant isn't the situation. Nonetheless it’s worthwhile endeavoring to alter the pattern to find out if it solves the trouble because you don’t want to maneuver on to the more complex diagnoses and fixes Except you might be Completely certain the distant/receiver is not the difficulty. Resetting the DIP Switches Didn’t Get the job done
Before you begin, make sure you turn the facility OFF and double-Test that no electric power is visiting the fixture! That’s virtually The main step of this complete job.
The Reside terminal is fed from The customer device and subsequently presents live electric power to one other cables within the circuit, In cases like this cable 1 provides the Dwell electric power within the resource or previous light, exactly where it really is taken by cables 2 and 3.